Design a blogger template from scratch

. Sunday, October 12, 2008
10 comments

Step 3 - The Basic Structure

  1. This is the basic visual structure of a template containing :
    • Header-Wrapper (Header)
    • Content-Wrapper
          • Main-Wrapper (Posts' section)
          • Sidebar-Wrapper
    • Footer-Wrapper (Footer)
    main-layout
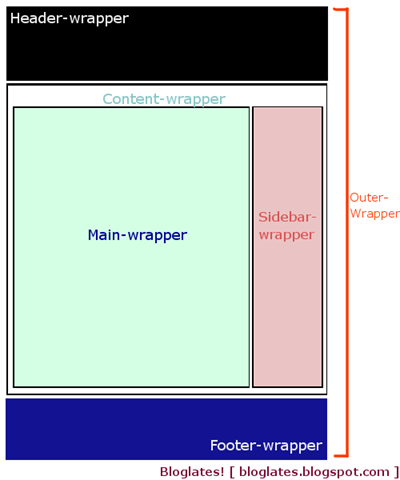
  2. The adopt that in our structure, for each one we must create a separate DIV section, like this :
    	<div id="outer-wrapper">
    		<div id="header-wrapper">
    
    		</div>
    
    
    		<div id="content-wrapper">
    			<div id="main-wrapper">
    
    			</div>
    
    			<div id="sidebar-wrapper">
    
    			</div>
    		</div>
    
    
    		<div id="footer-wrapper">
    
    		</div>
    	</div>
    

  3. Copy/Paste the above code between in your BODY section, between the body tags.
  4. Save your Template.
  5. Return to your blogger account (in Edit HTML) and choose Browse to find your template (test.xml) and then upload it.
  6. Reload your blog page (xxxxx.blogspot.com). What you must be seeing now is nothing but a blank screen.
  7. Are you ready to start filling the void? If so, proceed to the next step.


<< Previous Step

Next Step >>

Design a blogger template from scratch

.
2 comments

Step 2 - The First Lines

  1. Open Wordpad or another editor and start a new empty text document. (Notepad++ is excellent for that purpose)
  2. The main structure of any web page is :
    <html>
    	<head>
    
    	</head>
    	
    
    	<body>
    	
      	</body>
    </html>
    
    Remember that the HEAD section usually contains general info (such as title, style properties, etc), where as the BODY section includes the main contents and structure.
  3. For this to work as basic XML template though, to this basic structure, we must add a few more details. Check out the differences marked in red.
    
    <?xml version="1.0" encoding="UTF-8" ?>
    <html expr:dir='data:blog.languageDirection' xmlns='http://www.w3.org/1999/xhtml' xmlns:b='http://www.google.com/2005/gml/b' xmlns:data='http://www.google.com/2005/gml/data' xmlns:expr='http://www.google.com/2005/gml/expr'>
    	<head>
    		<b:skin><![CDATA[
    
    		]]></b:skin>
    	</head>
    	
    
    	<body>
    	
      	</body>
    </html>
    
  4. Copy/Paste the above text to your empty Text Document. Save your document as Test.xml.
  5. Return to your blogger account (in Edit HTML) and choose Browse to find your template (test.xml) and then upload it.
  6. If it asks for your permission to delete several widgets, if this blog is really an experimental one, then accept.
  7. Reload your blog page (xxxxx.blogspot.com). What you must be seeing now is nothing but a blank screen.
  8. Are you ready to start creating our layout? If so, proceed to the next step.


<< Previous Step

Next Step >>

Design a blogger template from scratch

.
1 comments

Step 1 - The preparation

  1. Log in your Blogger account.
  2. From the Dashboard, choose Create a Blog (or use an already existing one - which will serve as a "test" blog)
  3. After you've got a blog ready for your experiments, go back to the Dashboard and Choose Edit HTML
  4. Are you ready to add our first lines of code? If so, proceed to the next Step.


Home

Next Step >>

Implement the Toggle Visibility function - Show/Hide anything

. Tuesday, September 30, 2008
0 comments

  1. Log in your Blogger account.
  2. From the Dashboard, go to Layout
  3. Choose Edit HTML
  4. Scroll down a bit or look for :
    </head>
  5. Immediately above that, copy/paste :
    <script language="javascript" type="text/javascript">
    function toggleVis( elemID )
    {    var elem = document.getElementById( elemID );
    	if( elem.style.display != 'none' )
            {        elem.style.display = 'none';
            }
            else
            {        elem.style.display = 'block';
            }
    }
    </script>
  6. Save your template.
  7. To use it, you just have to create a DIV and give it an ID. And then, create an instance which (e.g. on click) will invoke the 'toggle visibility' function of your DIV.
  8. Example :
    <a onclick="toggleVis('example');">
    Click here to toggle visibility of the following element</a> <div id="example">This is the element to be toggled</div>

    produces...
    Click here to toggle visibility of the following element
    This is the element to be toggled

HTML Tutorial - <a> tag

.
0 comments

Usage : Creates hyperlinks, the text that you can click on in your web browser to go to another web page

Syntax :

<A HREF="URL" params>TEXT-TO-BE-DISPLAYED</A>

Optional Params :

NAME: name a section of the page
TARGET: which window the document should go in
TITLE: suggested title for the document to be opened
onClick: script to run when the user clicks on this anchor
onMouseOver: script to run when the mouse is over the link
onMouseOut: script to run when the mouse is no longer over the link

Example :

<A HREF="http://bloglates.blogspot.com">Bloglates!</A>

produces...

Bloglates!

How to change the favIcon

.
0 comments

  1. Log in your Blogger account.
  2. From the Dashboard, go to Layout
  3. Choose Edit HTML
  4. In the first few lines, look for :
    <head>
  5. Immediately below that, copy/paste :
    <link href='URL' rel='shortcut icon'/>
  6. Replace URL with the location of your favIcon image
    (e.g. http://xxx.googlepages.com/fav.ico)
  7. Save your template.
  8. Done! The new FavIcon will show up after one-or-two browser refreshes.

How to remove the Navigation Bar

. Monday, September 29, 2008
0 comments

  1. Log in your Blogger account.
  2. From the Dashboard, go to Layout
  3. Choose Edit HTML
  4. Scroll a bit down, and look for :
    <b:skin><![CDATA[/*
  5. A few lines below that, copy/paste :
    #navbar-iframe {
    height:0px;
    visibility:hidden;
    display:none
    }
  6. Save your template.
  7. Done! The NavBar is gone.

.