Step 3 - The Basic Structure
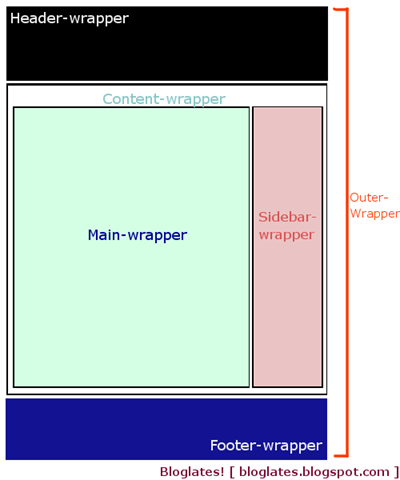
- This is the basic visual structure of a template containing :
- Header-Wrapper (Header)
- Content-Wrapper
- Main-Wrapper (Posts' section)
- Sidebar-Wrapper
- Footer-Wrapper (Footer)

- The adopt that in our structure, for each one we must create a separate DIV section, like this :
<div id="outer-wrapper"> <div id="header-wrapper"> </div> <div id="content-wrapper"> <div id="main-wrapper"> </div> <div id="sidebar-wrapper"> </div> </div> <div id="footer-wrapper"> </div> </div> - Copy/Paste the above code between in your BODY section, between the body tags.
-
Save your Template.
-
Return to your blogger account (in Edit HTML) and choose Browse to find your template (test.xml) and then upload it.
-
Reload your blog page (xxxxx.blogspot.com). What you must be seeing now is nothing but a blank screen.
-
Are you ready to start filling the void? If so, proceed to the next step.
|
Next Step >> |


10 comments:
I can't access the next page. Can you help me?
Thanks!
laura@lmarketingandpr.com
Very nice tutorial. Please keep going. I m too going along with you with a new scratch template..
Could you please tell me how you show the codes in 'CODE' tags. Please explain on how to install on blogger template. I m too in programming and need this stuff for my blog.
Thanks in advance..
yeah, i'd like to see where this is going, its really easy to follow thus far!
this tutorial was really promising :(
please continue.
Yea, hurry and continue already...
Um way to keep us hanging there. I though this was my saving grace. Guess not... :(
peoples here are crying to wait for your next posts. i also one of them.
damnit i didn't notice that the tutorial ends here. please finish this!!! :(
for those of you that need a more complete tutorial about creating a Blogger template from scratch, this might be useful:
http://www.elated.com/articles/create-your-own-blogger-template/
good post!
Post a Comment